Showing posts with label craft. Show all posts

Friday, June 24, 2011

featured


My Etsy Shop has been featured on What Katie Does.

She's written a post featuring Vintage UK Etsy sellers, there's lots of cool stuff on there!

Check it out!

Sunday, January 16, 2011

coffee table

A few months ago we got fed up with our boring coffee table which was a cheapo fake wood temporary fix that we bought soon after moving in so we'd have something to eat off of. We looked around at lots of options such as some nice rustic farmhouse style tables, storage ottomans and even thought about making our own from scratch, but in the end we went for the upholstery option. By following this tutorial we turned our bad looking coffee table into something that we're proud of. All we did was paint it white, drill some holes and secure the foam, batting and fabric with a heck of a lot of staples. Getting the buttons through was probably the hardest part because the table top is made from two pieces of wood and is hollow in the middle, making it a bit tricky to get a needle through both holes, but it really wasn't that bad at all. It's firm enough to set your coffee on and soft enough to rest your feet. Sadly, I don't have a good before pic of it, probably because it was something I avoided with my lens as well as my eyes. This was seriously the easiest makeover project, and took us two evenings after work to complete. I like the fact that we can easily switch the fabric and buttons if we ever want a change.


Monday, October 11, 2010

the £6 couch makeover that took 8 months

Way back in March I posted this post with the picture below as a preview of a project I had started.
It all began with the picture below. This picture is of our first meal in our house the day after we moved in. Please note the sofa, it is approximately 20 years old and had belonged to Sam's parents, then later his sister who gave it to us when they were remodeling their house which was conveniently around the time we were getting married and moving into ours. It's a massive comfy couch, the only problem was that it was absolutely ______ fill in the blank. I can't say the words I truly feel because I don't want to offend anyone.


BEFORE
AFTER


And by after I mean 8 months after I started I finally finished. What happened was we were in Ikea looking at duvet covers and blankets and saw some huge cotton "throws" and I realized they would be the perfect material to cover the couch. And at £2 per throw it was a bargain. We got three and it was more than enough material. So when we got home that night I began the process of covering the cushions and scratching my head as to what to do with the rest of it. After a couple of days I had all the pieces cut and most of it sewn together but just never made the finishing touches of hemming the sides or securing the front "flap" if you will. Unfortunately I can't explain how I did it because there was no method or pattern, I just pinned the fabric over the couch and then took it off and sewed it. I had to put it on and take it off to adjust it quite a bit, and just kind of worked little by little until it fit. It's basically just a slip cover.


Monday, September 6, 2010

don't laugh...

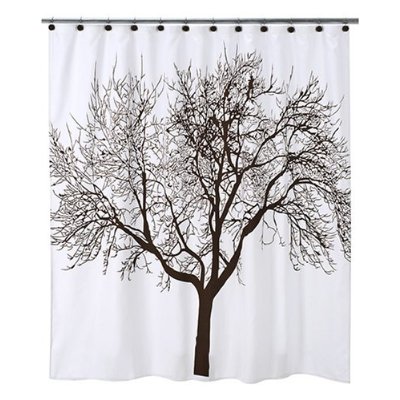
I've been obsessing over this shower curtain from Target for quite some time:
I love it, and can't get it out of my mind. Unfortunately for me, however, I live in a land without Target--I know, sometimes I just don't know how I survive either. So while it's perfect for me (ahem, for us, because Sam's decorating opinions matter too, and luckily for him he likes this one), and it's really a reasonable price, I have had a hard time sealing the deal and ordering it because when I add on shipping to my parents, and then calculate how much it will then cost my mom to ship it over the pond to me, it's kind of a lot of effort to go through for a shower curtain (although I don't think twice when putting in a request for hot tamales). Anyway. I had a weekend to myself at home recently and the idea came to me that I could make my own tree shower curtain--yes, yes I could... So I did...

**This is the part where you're not supposed to laugh**


Before I say anything else, let me just say that I realize this looks like something a kindergardener would produce in art class. I simply used a brown permanent marker (which was trying to die) to draw a tree onto our £1 gross "fabric" shower curtain. It's obviously not a fantastic outcome, and I'm still pretty desperate to have the real thing, but it gave me the idea that it would be really cool to draw all kinds of things on £1 "fabric" shower curtains. Like stripes, or words even, or cool geometric designs--the sky's the limit really. And this one will have to do until Christmas when I get the real tree shower curtain of my dreams as a gift:) Just kidding. But seriously.

Saturday, August 21, 2010

bathroom improvements


This is not the bathroom of my dreams, it's the bathroom of my reality, so I have to make the best of it. We recently found an old mirror at a car boot sale for £5 that I sanded down and repainted, it weighs about 30 pounds because of the glass. I have been trying to find some shelves for our bathroom above the toilet pretty much ever since we moved in, and everything is either boring, expensive or impossible to find. I wanted to put up two old wooden wine crates but they fall under the "impossible to find" category. So I spent 2 whole days at work last week on the internet looking for a suitable alternative (as you do), and then when I was driving home one day the answer came to me. We bought two of these bins from Ikea a few months ago and they have just been on our bookshelf not really doing much. They are the perfect solution; they're not plain old shelves and they're items we already own--score! The best part was that it gave Sam another chance to use his power drill to make more holes in our 134 year old plaster walls, which is always an enjoyable experience for him:) Anyway, here you go, it's not really a completed product but it's miles better than before.

BEFORE:


AFTER:


cabinet memo board

Today I copied a super idea that I got from Ashli at Maillardville Manor who got the idea from here. I found it was actually cheaper to buy a bulletin board--all I had to do was take the frame off (to use for something else??) and cut the cork down to size. Then I covered it with some fabric and put it up on the inside of one of our cabinet doors like so:


Now I just need to figure out a good way to organize all of our spices...


Thursday, August 19, 2010

a little apron for a little person

I made this little apron for my niece who turns two next week. It will be the perfect accessory for the awesome kitchen set she's getting!!

Saturday, March 27, 2010

Birthday Bags for My New Sisters

Two sisters-in-law. Two birthdays. Two bags...

The Kezia Bag:


The Olivia Bag:


Bought the fabric at Hobby Lobby when I was home a couple weeks ago. Wish I had bought more. I so wish we had Hobby Lobbys here (Lobbies?) and also Target. I went to target 5 times when I was in Texas. I was there for 7 days.

My Button Monogram Pillow / Driving Lessons Part 2


Here is my version of what Sarah made in the tutorial below. I did not put a zipper on because I was enjoying myself, and I didn't want to ruin that:) It has an envelope closure instead. I made this from the pillowcase that came with the duvet that I used to make my curtains.

DRIVING UPDATE:

So I had my first driving lesson. The instructor is a guy who is friends with one of my coworkers so he was in the office before the lesson and they were all teasing me and even made fun of my Ugg boots--something about being able to drive with dead puppies on my feet. Ha. Ha. He's an okay guy really.

Anyway, I drove around for about 30 minutes, reversed around a corner and parallel parked. He said I drive like someone who has been driving for a long time and that I would have failed if it had been the test. Awesome. I don't check my mirrors enough, "They must be checked every 15-20 seconds and every time you put your foot on the brake" (I totally made my self dizzy trying to do it that often on my drive home that night--NOT SAFE). And I follow cars too closely, "You must be able to see the tires on the tarmac." He was excited to tell me there is nothing I need to change about the way I steer--oh yippie skippie! But that I'm not supposed to use all of the gears because it is not environmentally friendly driving and they take points off for that, and also you are not supposed to wave a thanks to anyone who lets you into traffic or stops to let you by because they could sue you for some reason that he did not adequately explain to me and I was pretty much ready to get out of the car by then anyway. Whatever. Just give me my flipping license and no one gets hurt.

Monday, March 22, 2010

It's beginning to look a lot like spring time!

I went home to Texas for a week two weeks ago, and when I returned to England it was a totally transformed place! Daffodils are blooming, there are buds everywhere, it's warmer, there's no need to take a coat with you everyday (although an umbrella is highly recommended) and the air is fresh and hopeful. Winter is just about over! I don't see my breath anymore when I wake up in the morning! Here are just a few pictures from around here that will brighten any day...


Ah... wasn't that refreshing? Flowers and veggies and strawberries--lots of things to look forward to in the next few weeks and months. I'm a big fan of English spring time.


Before I left for a week I started a very exciting project that I am completely thrilled about. I'm not quite finished, but let me just tell you, it's AMAZING. I can't wait to show you:) Here's a sneak peak:

Saturday, February 27, 2010

Button Monogram Pillow Tutorial

Here it is, the tutorial you've all been waiting for.  Take it away Sarah...

On a recent trip to my local thrift store, appropriately named Nifty Thrift, I struck gold pink. I pulled up in front of the outdoor clearance rack, and this full length silk dress was staring me in the face.


After making this pillow, I had in mind to make a pink one for my eldest niece. Even on sale, the silk fabric I used for the first pillow ran about $12/yard. Total cost for this lovely pink dress.....50 cents!
 
After freshening up the dress with a spin through the wash, I decided to try it on. Funny enough, it fit perfectly! However, since I didn't have any plans to go as Barbie next Halloween, I decided to stick with my original plan and use the fabric for a pillow case. Here's how you can make your very own button monogram pillow.
 
What you'll need:

-12" x 16" pillow form
-17" x 13" fabric, 2 pieces
-60" (5 feet) of 1/2" pom pom trim
-12-14" invisible zipper
-invisible zipper foot for sewing machine
-assorted buttons
-Iron

 
Wash, dry, and iron your fabric before beginning. Start by cutting two pieces of fabric, 17" x 13" each. Keep in mind the width of your trim. This is roughly the amount of seam allowance you will need for each side. For example, if the base of your trim is 1/2" wide, you will need a 1/2" seam allowance on each side of your fabric. If the width of your trim is smaller, you will want to cut your fabric a bit smaller so that your pillow case fits snugly.
 
Next, pin the trim to the right side of one piece of fabric, pom poms facing in. 


Using a basting stitch, sew the trim to the fabric. This will help keep it in place when you sew the two pieces of fabric together.
 
Pin your fabric, right sides together, making sure the trim is tucked in. You want to sew as close to the inside edge of the trim as possible (the edge nearest the pom poms). For our trim, we will want to sew about 1/2" in from the edge, around three sides of the pillow. IMPORTANT: Do not sew both long edges, one will be left open for the invisible zipper. Make sure to back tack at the beginning and end of your seam (To back tack, sew forward a few stitches, backward a few stitches, and then forward again, continuing with your seam. This will prevent your seam from unraveling.)
 
Snip both corners of your pillow so they look clean when turned right side out. Turn your pillow right side out and make sure your trim looks nice and neat.
 
To add the invisible zipper you will need a clothes iron and invisible zipper foot. The invisible zipper will come with installation instructions. Follow these exactly! If this is your first time to install an invisible zipper, you may want to practice first. The instructions are a little confusing the first time through.
 
Once you've added your zipper, you're ready to add your buttons! Using chalk (or a disappearing marking pen) trace your letter onto the front of your pillow. This will be your guide when adding the buttons. Sew the buttons on by hand. I like to tie off my thread after every few buttons. That way if I want to go back and move a button, I'm not undoing the entire letter. Make sure to use buttons in a variety of shapes and sizes, and layer them throughout your letter. I ordered my buttons in bulk off of Ebay for a few dollars.
 

Insert your pillow form, zip your zipper (if you can find it after the amazing job you did at making it invisible) and enjoy your personalized pillow!


**For more projects like this one visit Sarah's blog.

Thursday, February 25, 2010

Meet Sarah!


Sarah is a dear friend of mine, as well as a fellow blogger and crafter. She works full time as an epidemiologist but still finds time to be a fantastic wife, renovate her home, and make these insanely cute felted animals:


You can follow Sarah’s blog ournestingground.blogspot.com where she shares lots of DIYs and decorating advice—and lots of funny real life anecdotes in between! You will also get the chance to experience the insights and humor of her husband Zach who is hilarious and also a very talented DIYer. Visit Sarah’s Etsy shop MinnieMillery to see all of her sweet felted creatures, as well as some other handmade items and vintage treasures.

When did you start making things by hand?

I'm sure my mom has a box full of macaroni art and finger paintings from my preschool years, but I would say that I first got interested in art around age 8 or 9, when my mom enrolled me in an oil painting class. I remember I was the only child in the class, and had a painting book with nothing but animals in it. My first painting was of a raccoon. It wasn't until after college that I became more interested in sewing and needlecrafting. Maybe getting married brought out the domestic side of me, or maybe it was buying our first house and wanting to create things to make it a home. Whatever the reason, making things by hand definitely helps me unwind after spending all day in front of a computer at work.

Where did you first get the idea for your felted animals?

A couple years ago I had no idea what needle felting was. I came across a feature in Radiant magazine and loved the little birds by Lauren Bradshaw. At the time, I thought they were just stitched together from felt. Then I starting seeing more and more needle felted pieces on places like Etsy, and shared them with my husband Zach. Thoughtful husband that he is, he bought me a needle felting kit for Christmas one year. After practicing with basic shapes, I started making animals. I use the same basic shapes for most of my animals, however my favorite animals to make right now are bears.

What was the toughest update you’ve made to your house so far?

Removing the popcorn ceiling! Although this job doesn't require a lot of skill, it's very messy and physically demanding. We tackled this project after we had moved in, which added to the difficulty. With 8 rooms (plus closets) across two stories, we were eating popcorn for months.Fixing the broken toilet waste pipe in the foundation of our half bath comes in as a close second.

Which was the most satisfactory?

When the last trace of popcorn was gone from our ceilings, we had quite a celebration. We jumped up and down, sang songs, and gave high fives. But I think one of the best transformations was our half bathroom. We pretty much gutted the space, replacing all the old fixtures and lighting. We added a classic pedestal sink, white bead board, and painted the walls sage green. It's a small space, but one of our favorites!

Give us your best tip or piece of advice when it comes to tackling a big project in your home.

Don't be afraid to make mistakes! Zach has definitely helped encourage me in this area....he doesn't call me Safety Sarah for nothing.


I am so excited to announce that Sarah has sent me an amazing tutorial that I will be posting very soon, so be sure and stop by to check it out in the next couple of days--it's a good one!

Thank you Sarah!!!

Saturday, February 13, 2010

after pictures of a little stool

I picked up this little foot stool for £2 at a car boot sale in the fall. At the time the legs were stained dark brown, and the top was covered with a orangey/puke colored velvet material. The man I bought it from said it was quite a special stool because all of his grandchildren had sat and played on it when they were young. I loved it, and love it even more now that it's a bit more my style.